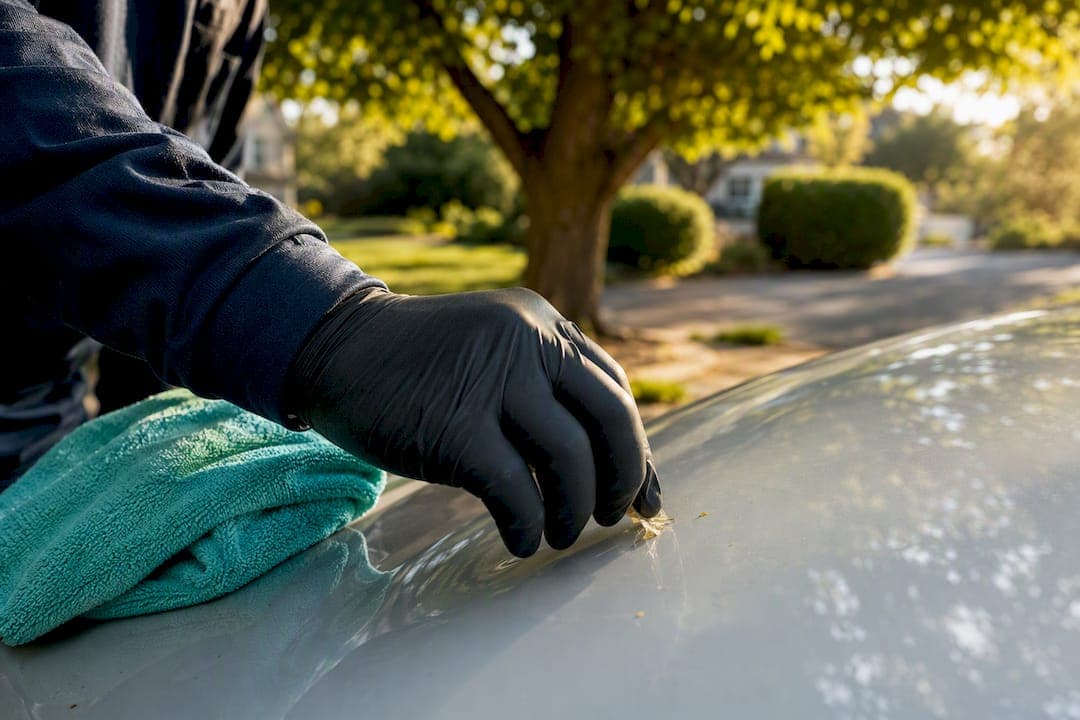
Wash the sappy area with car soap, then try isopropyl alcohol or a dedicated bug and tar remover. For hardened spots, apply a sap remover, wait, then lift the residue with a plastic scraper or clay bar. Test any product on a hidden panel first, skip acetone and other harsh solvents, and if the paint looks etched, stop and call a professional detailer.
TL;DR:
- Fresh sap can be removed safely with mild soap and microfiber blotting, but prompt action is essential to prevent etching or cracking.
- Hardened sap requires chemical softening with dedicated removers and gentle scraping; avoid metal tools to prevent paint damage.
- Use only approved products like isopropyl alcohol, specific sap removers, or clay bars, and avoid harsh solvents such as acetone or gasoline that can strip clear coat.
- Always test any product on a hidden area and work in shade, as heat and direct sun increase risk of damage and reduce product effectiveness.
- For extensive or damaged sap, professional detailers have stronger tools and techniques, including machine polishing, to restore the paint without risking further harm.
Table of Contents
- Fast Fixes for Fresh and Hardened Tree Sap
- How Do You Remove Fresh Sap Without Damaging Paint?
- What's the Best Way to Get Hardened Sap Off a Car?
- Which Products Are Safe, and Which Ones Ruin Paint?
- How Do You Protect Your Paint After Removing Sap?
- When Should You Call a Professional Detailer Instead?
- What Happens to Sap Residue That's Left Behind?
- A Mobile Detailer's Take on Sap Season
- Skip the DIY Risk with a Mobile Detailer
- Sources
- FAQ
Fast Fixes for Fresh and Hardened Tree Sap
Not all sap is the same problem. A fresh drop that landed on your hood this morning behaves nothing like the amber blob that baked onto your roof for three weeks in the Florida sun. Here's what actually works for each.
For fresh, sticky sap:
- Wash the spot with car soap and warm water, using Dawn dish soap as a household backup if that's what you have on hand.
- Blot, don't scrub, with a clean microfiber towel to lift the sap without grinding it into the clear coat.
- If soap alone doesn't cut it, dampen a microfiber with isopropyl alcohol and wipe gently in one direction.
For hardened, baked-on sap:
- Apply a dedicated sap, bug, and tar remover and let it dwell per the product label — for detailed guidance, see the bug splatter removal techniques that keep your paint safe.
- Use a plastic scraper at a low angle to lift softened residue. Never reach for a metal blade or razor.
- If a stubborn patch remains, follow up with a clay bar and detailing lubricant.
Keep a small kit in your garage: microfiber towels, a plastic scraper, a clay bar kit, and a bottle of 70% isopropyl alcohol. That combination handles most sap situations you'll run into on a driveway.
A few precautions matter more than people expect. Work in the shade, not direct sun. Sap softens with heat, but so does your clear coat's tolerance for solvents, and a hot panel reacts faster and less predictably to chemicals. Always test in an unseen spot first, and keep dwell times short. Rushing a five-minute soak because you're impatient is how bumper stickers of etched paint end up on detailing forums.
How Do You Remove Fresh Sap Without Damaging Paint?
Fresh sap is forgiving if you move fast and skip the shortcuts. Consumer Reports notes that sap hardens in heat and can eventually etch or crack the clear coat, so speed matters more than force here.
-
Wash and dry the area first. Rinse away dust, pollen, and road grit before you touch the sap directly. Grinding grit into a sap spot while wiping is one of the most common ways people scratch their own paint trying to fix a small problem.
-
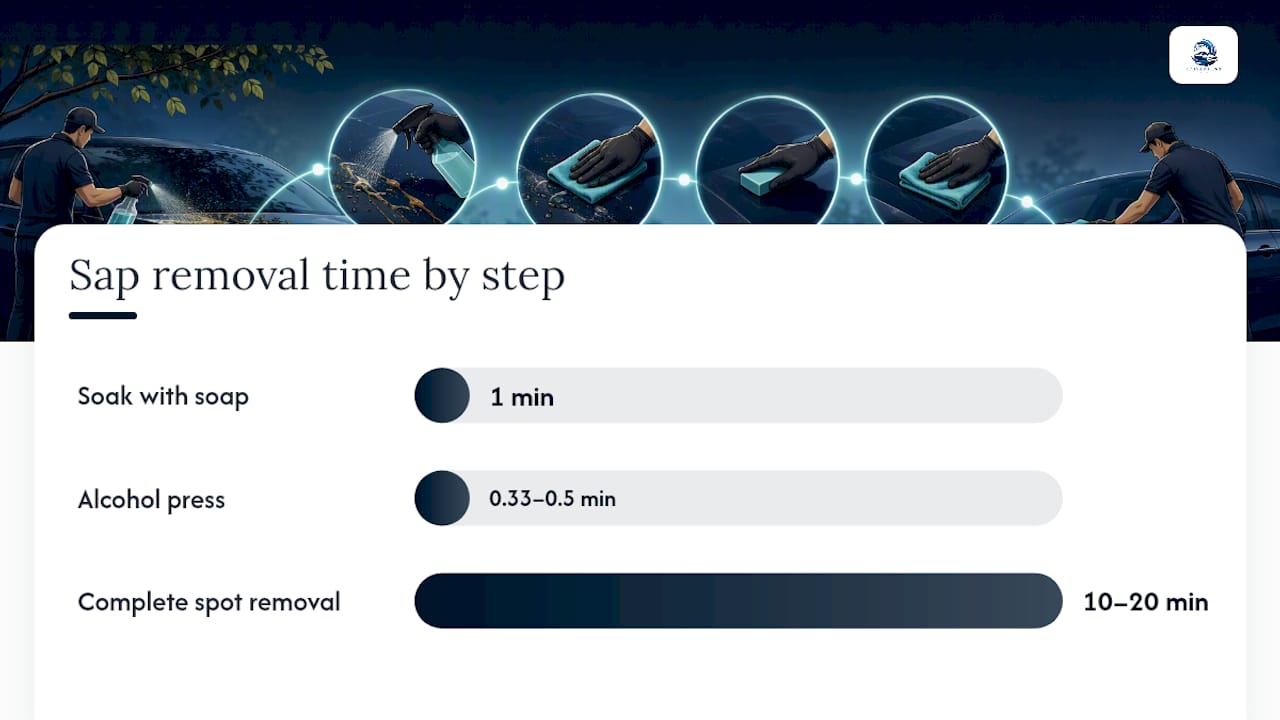
Try warm soapy water with a soft microfiber. Mix a few drops of car wash soap, or Dawn dish soap if that's what's handy, into warm water. Soak a microfiber towel, lay it over the sap for a minute, then blot rather than scrub. Dawn works because it's a strong degreaser, but repeated use can strip wax faster than a dedicated car soap, so treat it as a fresh-sap fallback rather than a weekly habit.
-
Step up to isopropyl alcohol if soap fails. Dampen a clean microfiber with 70% isopropyl alcohol. Press it against the sap for 20 to 30 seconds, then wipe gently in a single direction. Avoid circular scrubbing. This step usually resolves sap that's been sitting for a day or two but hasn't fully cured yet.
-
Rinse, wash, dry, then protect. Once the sap is gone, wash the whole panel again to clear away any alcohol or soap residue, dry it with a clean towel, and apply a quick detailing spray or a coat of wax. Skipping this last step leaves the paint exposed right where the clear coat was just stressed.
The whole sequence typically takes 10 to 20 minutes for a single sap spot, longer if you're dealing with several splatters across the roof or hood after a windy day under a pine or maple tree.
Pro Tip: Keep a microfiber cloth folded into quarters and rotate to a clean section every time you wipe. Reusing the same soaked corner just smears dissolved sap back onto the paint instead of lifting it away.
If you're working near the windshield, the same soap-then-alcohol order applies, but glass tolerates slightly more aggressive rubbing than paint does. Detailers dealing with baked-on windshield sap sometimes reach for WD-40 on glass specifically, since it's more forgiving on a hard, non-porous surface than it is on clear coat.
What's the Best Way to Get Hardened Sap Off a Car?
Hardened sap is a different animal. It's had days, sometimes weeks, to cross-link and bond to the clear coat, and treating it like a fresh spot usually means more scrubbing pressure than the paint can safely take. The fix is a slower, staged approach that leans on chemistry before it leans on force.
-
Wash the car first, every time. Skipping this step and going straight to a scraper is how people grind embedded dirt into the paint while trying to pry up sap. A clean surface means anything you feel with the scraper afterward is sap, not grit.
-
Apply a dedicated sap, bug, and tar remover. These products are formulated to break down the resins in tree sap more effectively than plain alcohol, and they're the safest and most effective route for stubborn spots according to detailer trade guides. Follow the label's dwell time, and reapply in short intervals rather than saturating the panel once and walking away for twenty minutes.
-
Lift softened sap with a plastic scraper, held at a low angle. This is the step where people get impatient and reach for a metal razor or a fingernail. Don't. Consumer Reports and detailer guidance both single out plastic scrapers as the safe tool here, precisely because metal edges catch on clear coat and leave permanent marks that no amount of polish fully removes.
-
Clay bar what's left after the chemical softening step. A clay bar with lubricant pulls out embedded contamination that alcohol and scrapers can't fully reach. Detailers recommend claying only after chemical softening, not before, because dragging clay across unsoftened sap creates unnecessary friction and risks marring the surface.
-
Wash again and inspect closely. Run your hand over the spot. If it's smooth and the paint underneath looks glossy and even, you're done. If you see dullness, a slightly rough texture, or a faint outline where the sap used to be, that's early etching.
Pro Tip: Work one small section at a time, roughly the size of your palm. Sap removers evaporate fast in Florida heat, and a large area treated all at once often dries out before you get to the scraping step, forcing you to start over.
That last inspection point matters more than most DIY guides admit. If the clear coat looks etched, cloudy, or discolored after your best attempt, stop. Further scraping or a stronger solvent won't fix etching, and it often makes it worse. That's a job for machine polishing or paint correction, not another round of alcohol and elbow grease. A tar removal walkthrough covers a similar sticky-residue problem if you want to compare techniques before deciding whether to DIY or call someone.
Which Products Are Safe, and Which Ones Ruin Paint?
The products that work safely on sap almost all share one trait: they're formulated to dissolve resin without attacking the polymer clear coat sitting under it. The products that ruin paint tend to be strong general-purpose solvents that don't discriminate between sap and the coating protecting your car.
Safe to use:
- Isopropyl alcohol (70% concentration is the common sweet spot)
- Commercial bug, tar, and sap removers made for automotive paint
- Clay bar kits with detailing lubricant
- WD-40 or a light mineral oil, mainly for glass or as a last-resort loosener on light residue
Avoid entirely:
- Acetone
- Lacquer thinner
- Turpentine
- Gasoline
- Nail polish remover that contains acetone
Here's the mechanism behind that list, and it's worth understanding rather than just memorizing. Clear coat is a cured polymer finish, and acetone in particular is a strong enough solvent that it can soften and dissolve that polymer layer on contact, not just the sap sitting on top of it. UTI's collision repair program flags acetone and lacquer thinner specifically as capable of stripping clear coats and damaging rubber trim and plastic trim pieces nearby. Once that happens, you're not looking at a quick fix. You're looking at a repaint.
Statistic-worthy fact: the products detailers actually reach for first, whether it's a household bottle of alcohol or a purpose-built sap remover, are consistently the "least aggressive method necessary" for the job, according to detailer trade guidance. That's the whole philosophy in one sentence: escalate only when the gentler option fails.
Before applying anything you haven't used before, test it on a hidden panel, inside a door jamb or under the rear bumper works well, and wait a few minutes to see if it clouds, discolors, or softens the finish. Cars recommends this step specifically because clear coats vary in age and thickness, and a product that's fine on a factory finish might react differently on a repaint or an older, weathered coat.
How Do You Protect Your Paint After Removing Sap?
Removing the sap is only half the job. Whatever product you used, alcohol, a sap remover, even soap, leaves behind a stripped or dried-out patch on the wax layer that was sitting there before. Skip this step and you're left with one shiny sap-free spot surrounded by paint that's still protected, which actually looks worse up close than the sap did.
- Wash the treated area again to clear off any leftover solvent residue.
- Dry it fully before applying anything else.
- Apply wax or a paint sealant over the spot, and ideally the whole panel, to restore the protective barrier you just stripped away.
On frequency, most detailers suggest waxing at least once per season, more often if your car sits outside under trees for long stretches. A detailing checklist built around routine exterior protection is worth keeping handy so sap checks become part of your regular wash instead of a separate emergency.
Prevention beats treatment here, and it's mostly about where you park. Sap production spikes seasonally, oaks and maples drop it in spring, pines run heavy in summer heat, so parking under a different tree for a few months can cut your sap incidents dramatically. A car cover helps if shaded parking isn't an option. And building a thirty second sap check into your weekly wash means you're dealing with fresh drops instead of three-week-old fossilized ones. Understanding how exterior detailing protects paint long term makes this prevention habit easier to stick to, since you can see the wax layer actually doing its job over time.
When Should You Call a Professional Detailer Instead?
Some sap situations are DIY-friendly. Others aren't, and knowing the difference before you start scraping saves you from turning a $20 problem into a $600 repaint.
- You see etching, cloudiness, or a rough texture where the sap used to be.
- Sap is spread across a large area, like a full hood or roof after parking under a tree for weeks.
- A previous DIY attempt already made things worse, spreading discoloration or leaving scratch marks.
Professional detailers work through a similar sequence to what's outlined above, but with stronger, better-controlled products, machine polishers instead of hand pressure, and paint correction available if the clear coat has already taken damage. The gap between a DIY plastic scraper and a machine polisher is significant. A pro can remove a thin layer of clear coat evenly across a panel, correcting etching that hand tools simply can't reach without risking more damage.
Some professional detailers handle this kind of job on-site, without needing your driveway's water or power hookup, which matters if you're dealing with a large sap incident and don't have a free weekend to haul the car to a shop. If you're getting quotes anywhere, ask for before-and-after photos from similar sap jobs.
What Happens to Sap Residue That's Left Behind?
Even a mostly successful removal often leaves a faint film behind, an oily sheen, a slightly sticky patch, or a dull spot where the sap sat longest. That residue is usually a mix of leftover resin and whatever solvent you used to break it down, and it's worth treating as its own small step rather than assuming the job is finished.
Start with a fresh microfiber towel and a mild car soap solution. Wash the exact spot again, even if it looks clean, to lift any oily film sap removers tend to leave behind. If the area still feels slightly tacky to the touch, a second short pass with isopropyl alcohol on a clean towel usually finishes the job. Rinse thoroughly afterward. Alcohol evaporates fast, but leaving trace residue under a coat of wax can cause the wax to bond unevenly and haze slightly over the following days.
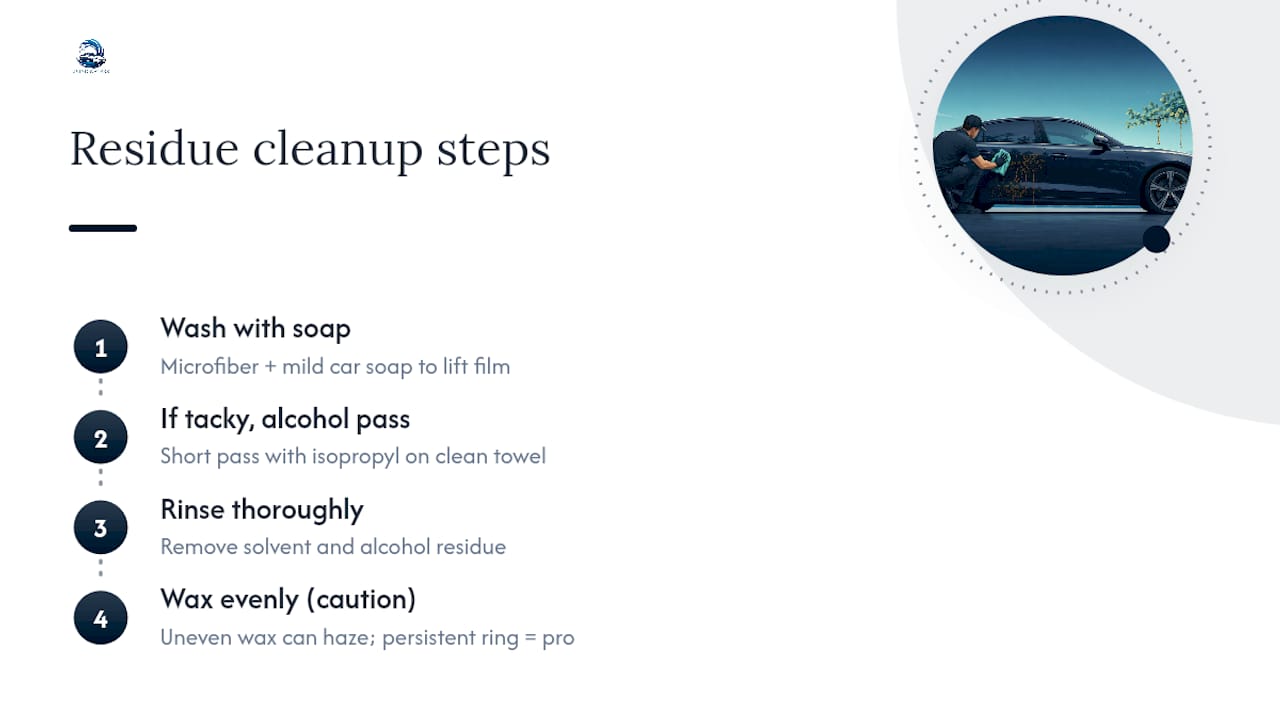
If you notice a faint ring or halo around where the sap was, don't panic. That's often just a difference in gloss where solvent stripped wax faster in the center than at the edges. A coat of wax or sealant applied evenly across the whole panel, not just the treated spot, usually blends it right back in within a wash cycle or two. If the ring persists after a proper wax application, it may be light etching, which points back to the professional route rather than another round of solvent.
A Mobile Detailer's Take on Sap Season
Certain patterns show up constantly in mobile detailing work. Roofs and hoods take the worst of it, simply because they're horizontal and catch everything falling from above. Pine sap season tends to run hotter and stickier than oak or maple drops, and it clings harder once it's baked in the sun for a few days.
The best pro habit worth stealing is patience. Detailers who rush the softening step end up scraping harder than they should, which is exactly how fine swirl marks show up on an otherwise clean panel. Working in shade isn't a nice-to-have, it changes how predictably a solvent behaves. And rubber trim around windows and mirrors deserves its own attention during cleanup, since alcohol and sap removers can dry it out with repeated contact over a season.
For readers who want to go deeper on related sticky-residue problems, the tar removal breakdown covers a nearly identical workflow, and the protection guide fills in the aftercare side in more depth than fits here.
— Living
Skip the DIY Risk with a Mobile Detailer
If you'd rather not gamble a clear coat on a bottle of alcohol and a plastic scraper, Living Waters Auto Wash LLC brings the entire paint-safe workflow to your driveway, no trip to a shop, no water or power hookup required.

Our team handles sap removal the same way it's laid out above: soften first, lift gently, clay if needed, then finish with a proper wax or sealant so the paint is actually protected afterward, not just clean for a week. That last step is where most DIY jobs fall short, and it's the difference between a spot that looks fine today and one that still looks fine in three months. Appointments typically run on a quick turnaround since everything needed is brought to your location. If your car has widespread sap, a hood full of it after a windy week, or a spot you've already tried to fix and made worse, book a mobile detailing appointment and let a trained team handle the paint correction properly the first time.
Sources
The safety guidance and step sequencing in this article draw on a handful of sources worth reading directly if you want more detail on any single step.
- 9 Household Items That Can Ruin Car Paint | UTI
- How to get tree sap and bugs off your car | Consumer Reports
- Cars
- Tree sap removal from car paint: Safe methods that work | Brilliatech
FAQ
How Do I Get Hardened Tree Sap Off My Car?
Apply a dedicated sap or bug and tar remover, let it dwell per the label, then lift the softened residue with a plastic scraper held at a low angle. Finish with a clay bar for any remaining traces, then wash and wax the area.
Will Dawn Dish Soap Remove Tree Sap From a Car?
Dawn can help lift fresh, still-soft sap when mixed with warm water, since it's a strong degreaser, but it works best as an occasional fix rather than a regular wash soap because repeated use strips wax faster than a dedicated car shampoo.
Will WD-40 Remove Tree Sap From Car Paint?
WD-40 can loosen light or baked-on sap, particularly on glass, but it isn't formulated for automotive clear coat, so wash the area thoroughly afterward and follow up with wax to restore protection.
Will Tree Sap Come Off in a Car Wash?
A standard car wash can remove very fresh, still-tacky sap, but hardened sap usually needs a targeted sap remover or alcohol treatment first since automated washes aren't designed to dissolve cured resin.
When Should I Stop DIY Sap Removal and Call a Detailer?
Stop if you notice etching, cloudiness, or a rough texture on the paint, or if the sap covers a large area like a full hood or roof. Living Waters Auto Wash LLC offers on-site mobile detailing across Boca Raton, Pompano Beach, Coral Springs, and Parkland for exactly these harder cases.